
EMPATHIZE
Understanding a problem from all perspectives.
Empathy is the foundation of Design Thinking. In order to develop effective solutions that people will embrace, we must first thoroughly understand how people - all different kinds of people, feel about the problem.
Videos
What is Empathy? Is it the same as sympathy? Dr. Brené Brown explains the difference in this delightful animated presentation.
How is empathy practiced in Design Thinking? Design Thinking guru, Tom Kelley shares a case study in empathy from his work at Ideo.
How can we truly understand what our stakeholders are experiencing? The NNGroup share some techniques for qualitative research.
Note: Design Thinking activities can be conducted live and in person with sticky notes and whiteboard, or virtually online utilizing collaborative tools such as Zoom and Miro with virtual sticky notes and whiteboard.
As you work through the empathy stage, remember to focus on the problem, not solutions!
1. Develop an Ethnographic Research Plan
Before you can "hit the streets" to learn more about your stakeholders, it's important to come up with a plan. You need to decide which stakeholders to interact with, what information collection activities and methods you will use, and how much time and resources to invest in the process.
Use your real or virtual white board to:
list the insights you wish to gain through your research. Combine your list into a 1-2 sentence statement on what you hope to learn through your empathy research.
Determine who you will study, when and where.
Read the below explanations of Desk Research, Observational Research, and Interviewing.
Discuss the methods you will use for your empathy research: online research, on-sight observation, conducting interviews and surveys, focus groups, and assign various methods to group members. You may partner up on some research, or share methods across all group members.
Identify subject area experts that you know of to interview.
Create questions for interviews, surveys, observations, and desk research (see below for details).
As a team, begin your research online investigating all information published about your Design Challenge along with attempted solutions at your institution and elsewhere. This research should either validate your Design Challenge or call it into question. Follow up on leads with phone calls when necessary. Make note of all you learn. Utilize it to further direct your investigation.
Utilize the instructions below for field agents to carry out interviews, observations, surveys, and desk researchover the next week. You will create personas and a journey map in class. When all is done, bring your research insights to class where you will create a sense-making affinity map.
2. Create Research Insights Spreadsheets for Each Team Member
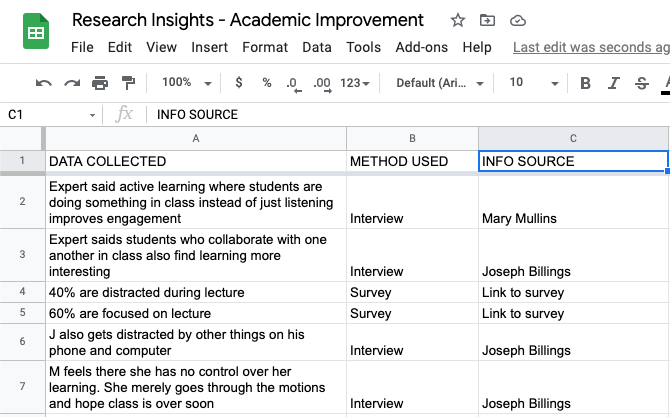
Each team member should record their own insights and findings in a research spreadsheet - sample Research Insights Spreadsheet.
Open the sample Google Sheet by clicking the link above
Select File > Make a Copy
Save the copy to your own Google Drive and edit it with your research data.
Research Methods

1a. DESK RESEARCH
At least one team member should engage in Desk Research. This form of research involves gaining empathy for the problem through online research and phone interviews, gathering information about the challenge and possible solutions others have implemented.
Get the facts online regarding the details of your design challenge.
Research the challenge at other similar institutions or organizations and how they have addressed it.
Collect online artifacts: photos, videos, charts, etc.
Learn everything you can about the problem and existing solutions.

1b. OBSERVATIONAL RESEARCH
At least one team member should engage in Observational Research. This form of research involves noticing and documenting the interactions between people and the environments that are central to your Design Challenge.
Begin by defining the questions you want to answer through your observations.
Select which stakeholders to observe, when and where - note this can be conducted online as well as in the field.
Decide which observational methods to use in your observations.
When observing in privately owned businesses and spaces, gain permission from those in authority.
Consider carrying a clipboard to take notes on and to indicate to others that you are observing as part of official business.
Take notes utilizing a customized observation template.
As you observe, keep your original questions in mind. Upon concluding your observations take a moment to reflect on what you learned.
In addition to taking notes, collect data by taking photos, video, and collecting materials like brochures, and other artifacts. For example, if you were working to improve safety for bicycles in bike lanes, you may find that some bike lanes are covered in hazardous gravel. Collecting photos of the gravel, or even collecting the gravel itself, as evidence would assist in developing your solution.

1c. INTERVIEWS and SURVEYS
There’s no better way to understand the hopes, desires, and aspirations of those you’re designing for than by talking with them directly. At least one team member should engage in interviewing stakeholders. You may find that interviewing in pairs allows for a smoother flow of questions, and also provides the perspective of two researchers to interpret what the subject says. Check out this 30-minute video on Getting People to Talk: An Enthnography and Interviewing Primer
Define the questions you want to answer with your interviews (not the interview questions).
Decide which stakeholders should be interviewed. Consider including extreme users.
Interview at least one subject area expert. This will be the most valuable research you conduct.
Design the interview like a story that has a beginning, a climax, and an end:
The beginning should include a warm greeting that allows a conversation to emerge naturally, and an overview of the purpose of the interview.
The climax should start with an easy set of questions that build trust, following by more challenging questions that get at the information you desire. All questions should be open-ended and exploratory in nature. Consider using the 5 Whys method to get deep into the detail of a subject's response.
After all questions have been answered, begin wrapping it up by letting the subject know that your questions have all been answered to satisfaction, and see if he or she has any questions for you. Ask how the experience was and don't forget to thank them for their time and input.
Conduct the interviews taking notes as you go (a clipboard is helpful). Pay attention to body language, tone, expressions, feelings and insights. After the interview, take time to reflect and take additional notes while the experience is fresh in your mind.
Build a survey with Google Forms, Survey Monkey, or other free online tool, to extend your survey questions to another dozen people online.
Conduct a Focus Group gathering stakeholders together in person or online and having them respond to well considered questions. Promote a discussion between participants to generate more insight.
Note: Design Thinking activities below can be conducted live and in person with sticky notes and whiteboard, or virtually online utilizing collaborative tools such as Zoom and Miro with virtual sticky notes and whiteboard.
2. Empathy Maps and Personas
Empathy Maps and Personas are two tools with a common goal - to fully understand the motivations, concerns, and characteristics of your stakeholder/customer/user. In order to gain full empathy for a problem, these tools can be applied to all stakeholders. However, in the interest of time you will apply them to your Primary Stakeholder only.
Watch the video about Empathy Maps just to get a sense of how they work. We will opt to develop a Persona rather than building an Empathy Map.
Next watch the video on Personas.
Use a Persona Card to capture the characteristics of your Primary Stakeholder.
Find a photo online or in a magazine that ideally represents what your primary stakeholder looks like.
Tape the photo on your whiteboard, or paste a photo on your virtual whiteboard in position as it is on the persona Card.
Give your Persona a Name, and Description (ie. Bob Foreman, a Freshman IT major)
Fill in the remaining information about your persona including a quote, a more detailed description of his or her characteristics (is. shy, first time away from home, etc), motivations, goals and behaviors. You might use sticky notes for these final three areas in order to get independent ideas from group members.
Capture a photo or screenshot of your Persona Card for future reference.
3. JOURNEY MAP
Now it's time to take your Persona through your Design Challenge journey using a Journey Map. In order to gain full empathy for a problem, a Journey Map could be developed for each type of stakeholder. However, in the interest of time you will develop a Journey Map for your primary stakeholder only. Journey Maps can take days to develop and fill entire walls of rooms. Our goal here is to simply get a feel for the value of developing a Journey Map so that when you work on your final project you will know how to use it.

Journey Map with sticky notes. Click image to enlarge.
Watch the video about Journey Maps.
Use a Journey Map to track your Primary Stakeholder through the design challenge journey.
Some virtual whiteboards provide Journey Mapping tools that can be utilized. Or you can build one from scratch with sticky notes.
Consider the scope and detail of the journey. A journey map can cover journeys that last years (i.e. the college experience), minutes (the online check-out process), or any time in between depending on what you are studying.
Map out the steps of your Primary Stakeholder as he or she experiences the problem you are studying. Place each step of the journey as column headings for your map. For example, if your Challenge has something to do with a dining experience, the steps might be - make reservation, drive to cafe, find parking, enter cafe, get seated, select from menu, etc.
In columns below your steps, use sticky notes that detail what occurs for each step in regards to row labels: Persona Goals, Touch Points, Organization Actions, Barriers, Enablers, and Insights and Opportunities (see example image).
Graph your Persona's emotions for each step of the journey.
Make note of significant insights gained from the Journey Map - points of tension and success. The Journey Map assists in identifying where to concentrate your efforts as you develop a solution in later steps.
Capture a photo or screenshot of your Persona Card for future reference.
4. RESEARCH SENSE MAKING
Once you've gathered research data through interviews, observations, cultural probes, online research, persona development, and journey mapping, it's time to make sense of it all. Use Research Sense Making to collect and examine your many pieces of qualitative data and to gain a common understanding about the reality of the customer.

Completed Affinity Map - Click image to enlarge
Find space where you can lay out all of your research data for examination - notes, photos, sticky notes and artifacts. If using a virtual whiteboard, make sure all research findings are represented on your board and review all of your research.
Working independently, catalog all of your insights and findings on sticky notes, using short phrases (3 - 6 words).
REMEMBER, you are sharing insights about the problem, not jumping to solutions.
As a group, post the notes on your whiteboard, discussing each sticky notes and working to create an Affinity Map. Group and arrange the notes based on their relation to each other.
Post all sticky notes on the whiteboard making them visible to the entire group.
Examine all the sticky notes, asking questions, and explaining your insights.
Rearrange the sticky notes into groups, putting notes that seem to be related together.
Discuss your groupings and come to consensus - the value in all of these exercise is the conversation that is generated!
Label the groups with large sticky notes.
Add artifacts like photos, sketches or diagrams to the Affinity Map if available
Identify patterns and insights and post in a separate space.
Take a photo or screenshot of your work for future reference.
The insights and patterns you identify in this final process should inform your problem framing, ideation and the remaining Design Thinking stages.
Select Key Insights
Team members should work independently to identify key insights - new knowledge that may hold the key to a solution, based on all the work your’ve completed in the Empathy stage. One key insight per post-it note. You can collect these key insights into a special area on your whiteboard.
Have each team member share their key insights with the team, explaining why they think they are key. You will use this information when developing your Reframed How Might We statement.